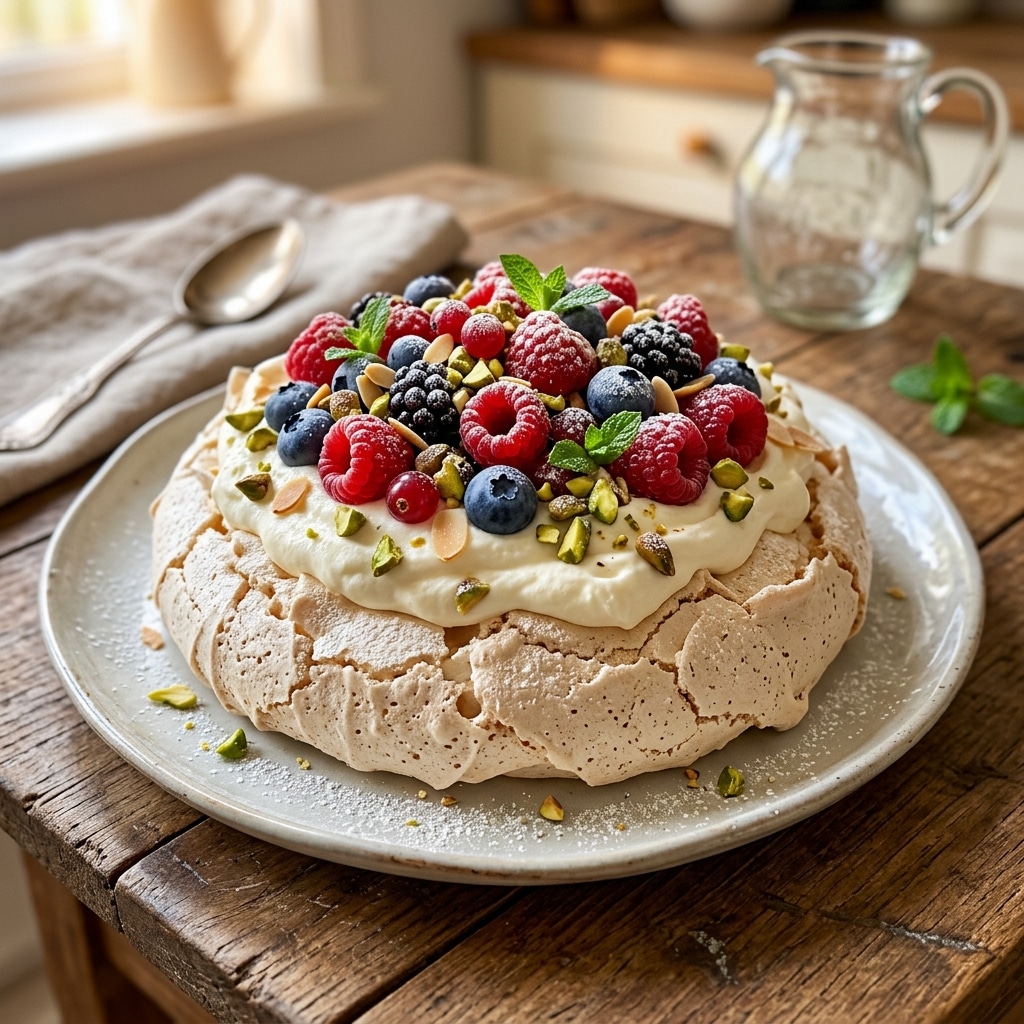
I love making pavlova because it looks stunning on the table while using surprisingly simple ingredients. The crisp outer shell and soft center create an incredible texture that pairs perfectly with fresh berries and cream.
This dessert feels light enough for warm weather gatherings but still impressive enough for holidays and celebrations. I also enjoy how customizable it is since I can switch up the fruit toppings depending on the season.
Ingredients
(Here’s a tip: Check out the full list of ingredients and measurements in the recipe card below.)
4 egg whites from large eggs
200 grams (1 cup) granulated sugar
1 teaspoon vanilla extract
Splash of lemon juice
360 ml (1.5 cups) heavy whipping cream
1–2 teaspoons granulated sugar (optional)
Splash of vanilla extract
110 grams (1 cup) raspberries
125 grams (1 cup) blackberries
135 grams (1 cup) strawberries, quartered or halved
1–2 tablespoons granulated sugar
Splash of lemon juice
Mint leaves, optional for garnish
Directions
I preheat the oven to 220°F (100°C).
I carefully separate the egg whites from the yolks, making sure absolutely no yolk gets into the whites because it can prevent the meringue from whipping properly.
In a completely clean mixing bowl, I add the egg whites and a splash of lemon juice. I begin whisking until the egg whites become frothy.
I add the vanilla extract and slowly sprinkle in the sugar one tablespoon at a time while mixing continuously. I take my time with this step so the sugar dissolves properly.
I occasionally scrape down the sides of the bowl to make sure no sugar crystals remain.
I continue whisking until stiff peaks form. The meringue should look glossy and hold its shape firmly.
I line a baking sheet with parchment paper and place a small amount of meringue under each corner to keep the paper from sliding.
I spoon the meringue onto the center of the baking sheet and shape it into a large circle about 8–9 inches wide. I build the edges slightly higher to create a shallow well in the center for the whipped cream.
Sometimes I swirl the edges with a palette knife to create decorative waves.
I bake the pavlova for about 90 minutes on the center rack until the outside feels crisp and set.
Once baked, I turn off the oven and let the pavlova cool slowly inside for at least 1–2 hours without opening the door.
Afterward, I crack the oven door open slightly and allow the pavlova to cool completely for another 30–60 minutes.
While the pavlova cools, I prepare the berries by washing them and slicing the strawberries.
I toss the berries with sugar and lemon juice and let them sit while I prepare the whipped cream.
To make the whipped cream, I whisk the heavy cream with vanilla extract and optional sugar until soft peaks form.
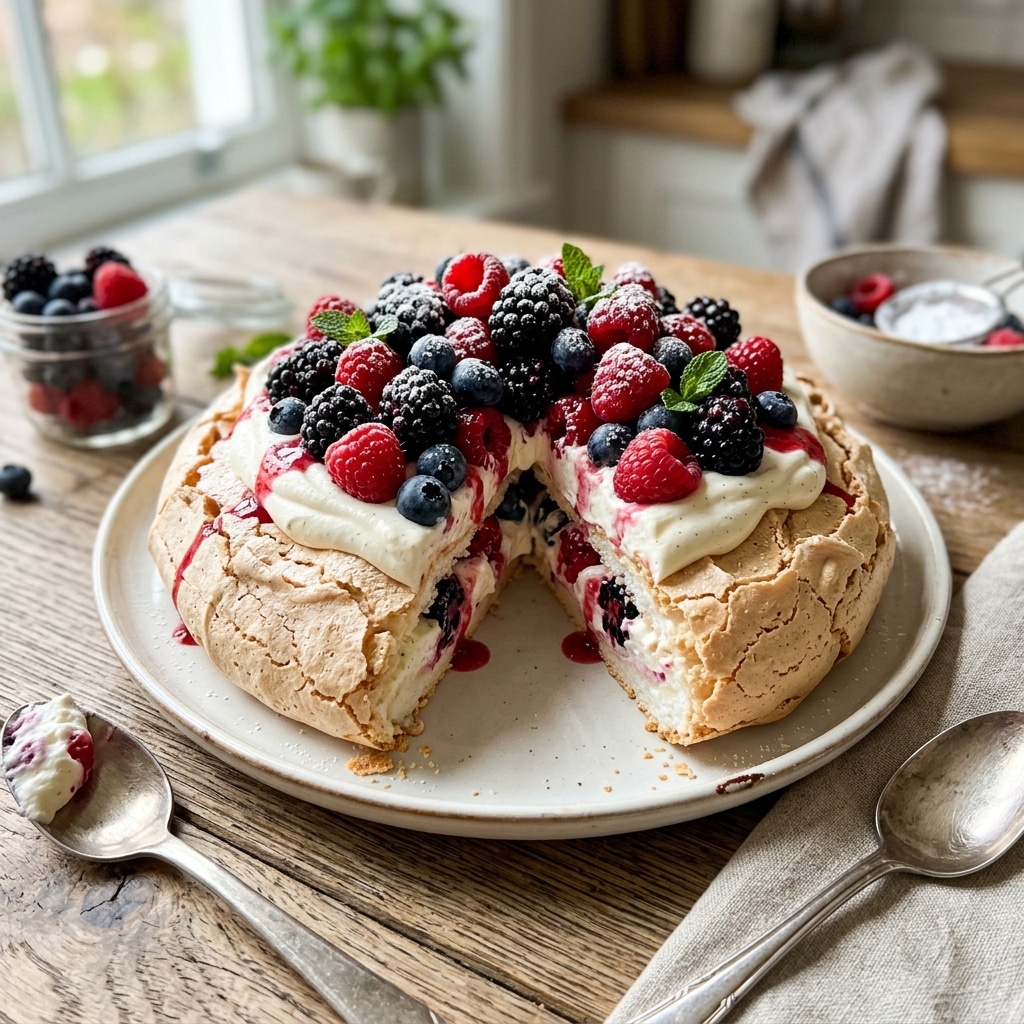
I transfer the cooled pavlova onto a serving plate and spoon the whipped cream into the center.
I top the whipped cream with the berry mixture and garnish with fresh mint leaves if desired.
I serve the pavlova immediately for the best texture and flavor.
Servings and Timing
This recipe makes about 8 servings.
Prep Time: 20 minutes
Cook Time: 1 hour 30 minutes
Cooling Time: About 2 hours 30 minutes
Total Time: 4 hours 50 minutes
Variations
I sometimes use blueberries, cherries, or sliced peaches depending on the season. For a tropical version, I love topping the pavlova with mango, passion fruit, and toasted coconut.
When I want extra richness, I occasionally drizzle the top with lemon curd or melted chocolate. I also enjoy flavoring the whipped cream with almond extract or citrus zest for a different twist.
storage/reheating
I store leftover pavlova in the refrigerator for up to 2 days, although it is definitely best enjoyed fresh. The meringue gradually softens as it sits with the whipped cream and berries.
If I want to prepare ahead, I usually bake the pavlova shell a day early and store it in an airtight container at room temperature. I assemble it with cream and fruit just before serving.
Reheating is not recommended since pavlova is meant to be served fresh and cool.
FAQs
Why did my pavlova crack?
I find that small cracks are completely normal in pavlova. As long as the outside is crisp and the inside stays soft and marshmallow-like, it turned out well.
Can I make pavlova ahead of time?
I like making the meringue shell a day ahead and storing it in an airtight container. I add the toppings right before serving.
Why do I add sugar slowly to the egg whites?
Adding the sugar gradually helps it dissolve properly and creates a smooth, glossy meringue instead of a grainy one.
How do I know when the meringue has reached stiff peaks?
I check if the meringue stands upright without collapsing when I lift the whisk. The mixture should also look thick and shiny.
Can I use frozen berries?
I prefer fresh berries because frozen berries release extra liquid, but thawed frozen berries can still work if drained well.
Conclusion
This berry pavlova is a beautiful dessert that combines crisp meringue, soft whipped cream, and fresh juicy berries in the most delicious way. I love how light yet indulgent it feels, making it perfect for celebrations, dinner parties, or summer gatherings. Once I slice into the crisp shell and see the soft center underneath, it always feels like a special treat worth making again.
A beautiful homemade pavlova topped with whipped cream, strawberries, raspberries, and blackberries for the perfect summer dessert.
Author:Sarah
Prep Time:20 minutes
Cook Time:90 minutes
Total Time:4 hours 50 minutes
Yield:8 servings
Category:Dessert
Method:Baked
Cuisine:Australian / New Zealand
Diet:Vegetarian
Ingredients
Pavlova
4 egg whites from large eggs
200 grams (1 cup) granulated sugar
1 tsp vanilla extract
Splash of lemon juice
Whipped Cream
360 ml (1½ cups) heavy whipping cream
1–2 tsp granulated sugar (optional)
Splash of vanilla extract
Berry Topping
110 grams (1 cup) raspberries
125 grams (1 cup) blackberries
135 grams (1 cup) strawberries, halved or quartered
1–2 tbsp granulated sugar
Splash of lemon juice
Mint leaves, optional garnish
Instructions
Preheat the oven to 220°F (100°C).
Separate the egg whites from the yolks carefully, ensuring no yolk gets into the whites.
In a completely clean mixing bowl fitted with a whisk attachment, add the egg whites and a splash of lemon juice. Whisk until frothy.
Add vanilla extract. Gradually add the sugar one tablespoon at a time while whisking continuously.
Scrape down the sides of the bowl occasionally to ensure all sugar dissolves properly.
Continue whisking until stiff peaks form. The meringue should look glossy and hold its shape firmly.
Line a baking sheet with parchment paper. Dab a little meringue underneath each corner of the parchment to keep it in place.
Spoon the meringue onto the center of the baking sheet and shape it into an 8–9 inch circle. Build the edges slightly higher to create a well in the center.
Use a palette knife or spoon to create decorative swirls around the edges if desired.
Bake on the center rack for 90 minutes until the outside feels crisp.
Turn off the oven and allow the pavlova to cool inside the closed oven for at least 1–2 hours.
Crack the oven door open slightly and let it cool for another 30–60 minutes.
Wash and prepare the berries. Add them to a bowl with sugar and lemon juice. Toss gently and let sit.
To make whipped cream, whisk the heavy cream with optional sugar and vanilla until soft peaks form.
Transfer the cooled pavlova to a serving plate. Spoon the whipped cream into the center well.
Top with the berry mixture and garnish with mint leaves if desired.
Serve immediately for the best texture.
Notes
Ensure the mixing bowl is grease-free or the egg whites may not whip properly.
Add sugar slowly to achieve a smooth, glossy meringue.
Small cracks are normal and part of a traditional pavlova.
Best assembled just before serving to maintain crispness.


