
Why You’ll Love This Recipe
I love that I can choose between frying or baking depending on how indulgent I want to be. The filling is incredibly flavorful with tender chicken, warm spices, and green chilies for a slight kick. They’re easy to customize with toppings like sour cream, salsa, or guacamole, and they freeze well too, so I can prep a batch and reheat later. It’s one of the most satisfying, crowd-pleasing meals I make at home.
Ingredients
(Here’s a tip: Check out the full list of ingredients and measurements in the recipe card below.)
1 to 2 cups vegetable oil, divided
Chicken Filling:
½ cup diced white onion
2 teaspoons minced garlic
½ tablespoon chili powder
¼ teaspoon oregano
½ teaspoon ground cumin
4 cups cooked, shredded chicken (a rotisserie chicken works perfectly)
1 teaspoon salt
½ teaspoon pepper
1 can (4 ounces) diced green chilies
8 burrito-size flour tortillas, warmed
2 cups shredded Monterey Jack cheese
Toppings (optional):
salsa, sour cream, guacamole, pico de gallo, lettuce, etc.
Directions
For the Chicken Filling:
-
I heat 2 tablespoons of vegetable oil in a large skillet over medium-high heat.
-
I sauté the diced onion until slightly softened, then stir in the garlic, chili powder, oregano, and cumin. I let that cook for about 1 minute until fragrant.
-
I add in the shredded chicken, salt, pepper, and green chilies, then cook and stir for another 5 minutes until everything is heated through. I set it aside once it’s ready.
To Assemble:
4. I warm the tortillas in the microwave to make them pliable.
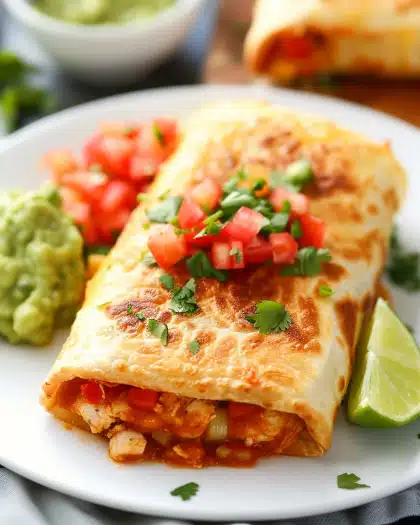
5. On each tortilla, I place about ½ cup of the chicken mixture in the center and top with 3 tablespoons of shredded Monterey Jack cheese.
6. I fold the sides in, then roll from the bottom to form a tight burrito-style wrap, placing them seam-side down on a plate.
Fried Version:
7. In a cast iron or heavy-bottom skillet, I heat about 2 inches of vegetable oil over low heat, gradually bringing it to 375°F.
8. Using tongs, I carefully lower each chimichanga seam-side down into the oil, holding it in place briefly to prevent unrolling.
9. I fry until golden brown on both sides, about 1 to 2 minutes, then transfer to a paper towel-lined plate to drain.
Baked Version:
10. I preheat the oven to 375°F and grease a baking sheet.
11. I place the wrapped chimichangas seam-side down on the sheet and spray the tops lightly with non-stick spray.
12. I bake for 20 to 30 minutes, until golden and crisp.
To Serve:
13. I serve them warm with my favorite toppings like sour cream, salsa, or guacamole.
Servings and timing
This recipe makes 8 chimichangas. From start to finish, it takes about 50 to 60 minutes — around 20 minutes of prep and up to 30 minutes of cooking, depending on whether I bake or fry.
Variations
I sometimes swap the chicken for shredded beef or pork if I have leftovers. For a spicier version, I add diced jalapeños or a splash of hot sauce to the filling. If I want to lighten it up, I use whole wheat tortillas and bake them instead of frying. Adding black beans or corn also makes the filling heartier and adds some texture.
Storage/Reheating
I store leftover chimichangas in an airtight container in the fridge for up to 3 days. To reheat, I use the oven at 350°F for about 10–15 minutes to keep the outside crispy. For a quick reheat, I use the microwave, but I wrap them in a paper towel so they don’t get soggy. These also freeze well — I wrap them individually in foil and freeze for up to 2 months, then bake straight from frozen.
FAQs
Can I make the filling ahead of time?
Yes, I often prep the chicken filling a day or two ahead. I store it in the fridge and just warm it slightly before assembling the chimichangas.
Can I use corn tortillas?
I don’t recommend using corn tortillas for this recipe because they tend to crack when folded and fried. Flour tortillas are more pliable and hold their shape better.
What’s the best way to keep them warm for a party?
I keep them on a baking sheet in a 200°F oven until ready to serve. That way they stay crisp and warm without drying out.
Are these freezer-friendly?
Absolutely. I wrap each cooked chimichanga in foil and freeze. When I want one, I just pop it in the oven at 375°F for 25–30 minutes until heated through.
Can I air fry them?
Yes! I spray them lightly with oil and air fry at 375°F for about 10–12 minutes, flipping halfway through, until they’re crisp and golden.
Conclusion
These Chicken Chimichangas are everything I love in a homemade meal — flavorful, crispy, and customizable. Whether I bake them for a healthier twist or go full-on crispy with the fried version, they never disappoint. It’s a recipe I turn to again and again when I want something comforting, satisfying, and sure to impress.
Chicken Chimichangas

5 Stars 4 Stars 3 Stars 2 Stars 1 Star
No reviews
These crispy chicken chimichangas are stuffed with juicy shredded chicken, green chilies, and melty Monterey Jack cheese—bake or fry for the perfect Tex-Mex dinner!
- Author: Sarah
- Prep Time: 15 minutes
- Cook Time: 20 minutes (baked) / 10 minutes (fried in batches)
- Total Time: 35 minutes (approx.)
- Yield: 8 chimichangas
- Category: Dinner, Main Course
- Method: Baking or Frying
- Cuisine: Mexican, Tex-Mex
Ingredients
For Frying/Baking:
1 to 2 cups vegetable oil, divided
Chicken Filling:
½ cup diced white onion
2 teaspoons minced garlic
½ tablespoon chili powder
¼ teaspoon oregano
½ teaspoon ground cumin
4 cups cooked, shredded chicken (rotisserie chicken works perfectly)
1 teaspoon salt
½ teaspoon black pepper
1 can (4 ounces) diced green chilies
8 burrito-size flour tortillas, warmed
2 cups shredded Monterey Jack cheese
Toppings (optional):
Salsa
Sour cream
Guacamole
Pico de gallo
Shredded lettuce
Instructions
Fried Version:
In a large cast-iron or heavy-bottomed skillet, add enough vegetable oil to reach 2 inches deep. Heat oil over low until it reaches 375°F.
Baked Version:
Preheat oven to 375°F (190°C). Lightly grease a large baking sheet with nonstick spray.
Chicken Filling:
2. In a large skillet, heat 2 tablespoons of vegetable oil over medium-high heat. Add diced onion and cook until softened.
3. Stir in garlic, chili powder, oregano, and cumin; cook until fragrant (about 1 minute).
4. Add shredded chicken, salt, pepper, and green chilies. Stir and cook for 5 minutes, until heated through. Remove from heat.
5. Warm tortillas in the microwave. Spoon ½ cup chicken mixture into the center of each tortilla, then top with 3 tablespoons Monterey Jack cheese. Fold sides inward, then roll tightly into a burrito-style wrap, seam side down. Repeat with remaining tortillas.
To Fry:
6. Using tongs, carefully lower one chimichanga at a time into hot oil, seam side down. Fry 1–2 minutes per side until golden brown. Transfer to paper towels to drain.
To Bake:
7. Place rolled chimichangas seam side down on prepared baking sheet. Spray tops lightly with cooking spray. Bake 20–30 minutes, until golden brown.
Serve warm with desired toppings. Enjoy!
Notes
Baking is a lighter method, while frying gives an authentic restaurant-style crunch.
Rotisserie chicken saves prep time and adds flavor.
Swap Monterey Jack with cheddar or a Mexican cheese blend for variety.
Chimichangas can be frozen before baking/frying and reheated for a quick meal.


