
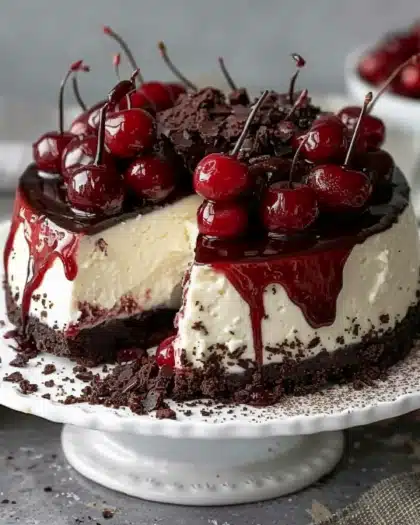
Why You’ll Love This Recipe
I love this cheesecake because it layers deep chocolate, tangy cheesecake, and juicy cherries in one bite. It’s perfect for celebrations or holidays, but I also make it when I just want a dessert that feels truly special. The combination of textures—crunchy crust, smooth filling, fruity topping—makes it a dessert I always look forward to.
Ingredients
(Here’s a tip: Check out the full list of ingredients and measurements in the recipe card below.)
For the crust:
-
Chocolate sandwich cookies or chocolate wafer cookies (crushed)
-
Melted butter
For the filling:
-
Cream cheese (softened)
-
Granulated sugar
-
Eggs
-
Sour cream
-
Heavy cream
-
Unsweetened cocoa powder
-
Melted semi-sweet chocolate
-
Vanilla extract
-
Salt
For the topping:
-
Cherry pie filling (or homemade cherry compote)
-
Whipped cream
-
Chocolate shavings or curls (for garnish)
Directions
-
I preheat the oven to 325°F (160°C) and grease a springform pan.
-
For the crust, I mix crushed chocolate cookies with melted butter, then press the mixture firmly into the bottom of the pan. I bake it for 8–10 minutes and let it cool.
-
For the filling, I beat the cream cheese and sugar until smooth. I add eggs one at a time, then mix in sour cream, heavy cream, cocoa powder, melted chocolate, vanilla, and salt.
-
I pour the filling over the cooled crust and smooth the top.
-
I bake the cheesecake in a water bath for 55–65 minutes, until the center is just set.
-
I turn off the oven, crack the door, and let the cheesecake cool inside for 1 hour to prevent cracks.
-
After cooling, I refrigerate it for at least 4 hours, preferably overnight.
-
Just before serving, I spread cherry pie filling on top, pipe whipped cream around the edges, and garnish with chocolate shavings.
Servings and timing
This cheesecake serves 10–12 people. It takes about 30 minutes to prepare, 1 hour to bake, and at least 4 hours to chill—so I usually make it the day before I plan to serve it.
Variations
-
I sometimes use Oreo cookies for the crust to add a sweeter flavor.
-
For a boozy twist, I mix a splash of kirsch (cherry liqueur) into the filling or drizzle it over the cherries.
-
If I want a lighter version, I use Greek yogurt instead of sour cream.
-
I’ve made mini cheesecakes in muffin tins for individual servings.
Storage/Reheating
I store the cheesecake covered in the refrigerator for up to 5 days. It also freezes beautifully—I wrap slices individually in plastic wrap and foil, then freeze for up to 2 months. When ready to enjoy, I thaw overnight in the fridge. This cheesecake is best served chilled and doesn’t need reheating.
FAQs
Can I use fresh cherries instead of pie filling?
Yes, I love making a homemade cherry compote with fresh or frozen cherries, sugar, and a splash of lemon juice.
Do I need a water bath?
I prefer it because it helps prevent cracks, but I’ve also baked without one by lowering the oven temperature and watching carefully.
How do I know when the cheesecake is done?
The edges should be set, and the center should have a slight jiggle. It firms up more as it cools.
Can I make this cheesecake ahead of time?
Definitely—cheesecake tastes even better after chilling overnight, so I almost always make it a day before serving.
What kind of chocolate works best for the filling?
I use semi-sweet chocolate for balance, but dark chocolate works if I want a richer, less sweet flavor.
Conclusion
Black Forest Cheesecake is one of those desserts that feels like pure indulgence. With its rich chocolate layers, creamy cheesecake, and sweet cherry topping, it’s the perfect blend of elegance and comfort. Whether I’m celebrating a special occasion or just treating myself, this cheesecake always steals the show.
Black Forest Cheesecake

5 Stars 4 Stars 3 Stars 2 Stars 1 Star
No reviews
This black forest cheesecake combines rich chocolate, creamy cheesecake, and sweet cherries for a decadent dessert everyone will love.
- Author: Sarah
- Prep Time: 25 minutes
- Cook Time: 1 hour
- Total Time: 5 hours 30 minutes
- Yield: 12 servings
- Category: Dessert, Cheesecake
- Method: Baked
- Cuisine: German-Inspired, European
- Diet: Vegetarian
Ingredients
For the Crust:
1 ½ cups chocolate cookie crumbs (such as Oreo, without filling)
¼ cup unsalted butter, melted
For the Cheesecake Filling:
24 oz (3 packages) cream cheese, softened
1 cup granulated sugar
1 cup sour cream
4 large eggs
8 oz semi-sweet chocolate, melted and slightly cooled
2 teaspoons vanilla extract
For the Topping:
1 can (21 oz) cherry pie filling (or homemade cherry compote)
1 cup heavy whipping cream
2 tablespoons powdered sugar
1 teaspoon vanilla extract
Chocolate shavings or curls, for garnish
Instructions
Preheat oven to 325°F (163°C). Grease a 9-inch springform pan and line the bottom with parchment paper.
In a bowl, mix chocolate cookie crumbs and melted butter until combined. Press mixture firmly into the bottom of the pan.
In a large mixing bowl, beat cream cheese and sugar until smooth and creamy. Add sour cream and vanilla, mixing well.
Add eggs one at a time, mixing on low speed until just incorporated. Stir in melted chocolate.
Pour batter over crust. Bake for 55–65 minutes, until the center is almost set (slightly wobbly is fine).
Turn off oven, crack door open, and let cheesecake cool inside for 1 hour to prevent cracking.
Remove, then refrigerate at least 4 hours or overnight.
Whip heavy cream with powdered sugar and vanilla until stiff peaks form.
Top chilled cheesecake with cherry pie filling, whipped cream, and chocolate shavings. Slice and serve.
Notes
Make ahead: Cheesecake tastes even better the next day once flavors meld.
For a more authentic Black Forest flavor, add 1 tablespoon kirsch (cherry liqueur) to the filling or topping.
Store in the fridge for up to 4 days or freeze (without toppings) for up to 2 months.
Swap canned cherries for fresh homemade cherry compote for a gourmet touch.


